How to take screenshot in laptop window 7
How to take screenshot in laptop window 7
Are you using a laptop with Windows 7 and need to take screenshot of something on your screen? Don’t worry, it’s actually quite easy! In this article, we’ll walk you through the different methods to take a screenshot on your laptop running Windows 7.

Method 1: Print Screen Button
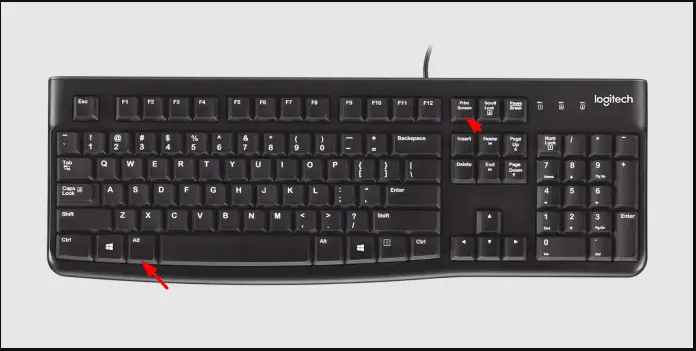
- Locate the “Print Screen” button on your keyboard, usually labeled as “PrtScn” or “PrtSc”.
- Press the “Print Screen” button to take a screenshot of your entire screen.
- Open Paint or any other image editing software.
- Press “Ctrl + V” or right-click and select “Paste” to paste the screenshot onto the canvas.
- Save the file to your desired location.
Method 2: Alt + Print Screen Button
- Click on the window or application that you want to capture.
- Press “Alt + Print Screen” to take a screenshot of the active window or application.
- Open Paint or any other image editing software.
- Press “Ctrl + V” or right-click and select “Paste” to paste the screenshot onto the canvas.
- Save the file to your desired location.
Method 3: Snipping Tool

- Click on the “Start” button and search for “Snipping Tool”.
- Click on the “Snipping Tool” to open it.
- Select the type of snip you want to make from the options: free-form, rectangular, window, or full-screen snip.
- Click and drag the cursor around the area you want to capture.
- Release the mouse button to take the screenshot.
- Save the file to your desired location.
In addition to the three methods mentioned above, there are a few other ways to take screenshots on a Windows 7 laptop that may be useful in certain situations.
Method 4: Windows Key + Print Screen Button
- Hold down the Windows key and press the “Print Screen” button.
- The screen will dim for a moment, indicating that a screenshot has been taken.
- Open the “Pictures” folder in your file explorer.
- Look for a new folder called “Screenshots” where your captured images are saved.
Method 5: Third-party Software

- Many third-party software options available online can assist in taking screenshots on your laptop, such as Lightshot, Greenshot, or PicPick.
- Simply download and install the software of your choice.
- Follow the instructions for using the software to capture screenshots in different ways, such as adding annotations or editing the image.
Remember, no matter which method you choose to take a screenshot on your laptop running Windows 7, it’s always important to save the captured image to a location where you can easily access it later. Whether you’re using the print screen button, Alt + Print Screen, Snipping Tool, Windows key + Print Screen, or third-party software, taking a screenshot is a useful skill that can come in handy in many situations.
Now that you know how to take a screenshot on your laptop running Windows 7, you can easily capture and save any important information or moments on your screen. Whether you use the print screen button, Alt + Print Screen, or Snipping Tool, you can easily document and share anything that appears on your screen.
ये भी पढ़ें –
Take Control of Your Data Usage: A Step-by-Step Guide to Set Metered Connection on Windows 10
Revolutionizing Productivity: 5 Must-Have AI Tools for Every Task
Best 8 Tips on How to buy a mobile phone


